Showing posts with label JDeveloper. Show all posts

Tuesday, April 24, 2012

Launching XML Publisher from OA Framework

Today's example shows how to generate an XML Publisher report from OA Framework. It uses the delivered DocumentViewer bean to invoke an XML Pub report by clicking a button, instead of running a Concurrent Manager program. Rather than just create a "Hello, world" example, we'll embed our custom report in a SSHR function to show how to feed in a parameter from the page.
Lettuce use the Personal Information screen in SSHR to add a button where an employee can generate an Employment Verification letter. I'm a techie and not a generalist so this might not be a great real-world HR example but it is meant to showcase embedding an XML Publisher report inside OAF.
First, lettuce create an XML Publisher report that contains an employee's basic person, assignment and salary information. I like to avoid Oracle Reports altogether so I build my own Data Definition as follows:

Save the above as an .xml file and upload it as an XML Publisher Data Definition by browsing to the following:
(N) XML Publisher -> Data Definitions -> Create
Configure as follows, browsing for your newly created .xml file:

While the point of this exercise is to create and XML Publisher report launched from OA Framework and not from Concurrent Manager, I will also create a Concurrent Program to demonstrate that the report can be launched from two places in Oracle Applications. I also will use the generated XML to create the XML Template for the letter. Here is the configuration of my Concurrent Program that calls XDODTEXE:


Prior to running this report we need to create a PLSQL package that will transfer the P_PERSON_ID parameter into the Data Definition. Copy and paste:
create or replace package gvs_emp_verif_pkg as
--
p_person_id number;
--
gc_person_id varchar2(300);
--
function before_report return boolean;
--
end gvs_emp_verif_pkg;
/
show errors;
create or replace package body gvs_emp_verif_pkg as
--
function before_report return boolean is
--
begin
--
gc_person_id := ' and papf.person_id = '||p_person_id;
--
return true;
--
end before_report;
--
end gvs_emp_verif_pkg;
/
show errors;
Compile these as APPS and then run the report...

After running the report you'll save this output as .xml and construct your .rtf template. Only a summary of the steps necessary for merging an .xml file with a template are shown here. For an end-to-end example, see the previous article "Using XML Publisher without Report Builder":
This is the draft template I will load into XML Publisher:

Browse to (N) XML Publisher -> Templates -> Create Template and configure as follows:

Here's how the letter looks when combining the XML with the template.

Our goal is to get this to launch out of an OA Framework page rather than a Concurrent Program. Here are the steps:
1. Create a custom OA Framework page that extends delivered /oracle/apps/xdo/oa/common/webui/DocumentViewerRn.MainRegion
2. Associate a Controller .class and Application Module to this custom page that invokes method "getXMLData"
3. Create an FND Form Function for the custom page
3. Use personalizations to create a button that points at the FND Form Function
One step at a time, lettuce create our page in JDeveloper:

Right-click your MainRN and add a new region. Populate the "Extends" property with the value /oracle/apps/xdo/oa/common/webui/DocumentViewerRn.MainRegion. You will see the region information populate and be grayed-out since it is delivered by Oracle.

Right-click your MainRN and choose Set New Controller so you can write a few lines of Java code that will pass the person id to the report.

If your JDeveloper application runs as slow as mine, leave this simmer for a few minutes while you personalize (configure) a button in Self-Service HR that will invoke this Page and Controller.
(N) Employee Self-Service -> Personal Information

In the above case I created my own custom responsibility, menus and functions. Click the personalize link in the upper right hand corner:

Click the Create icon next to the cell that has the Update button:

Configure as follows:

That configuration will call our custom page and OA Framework code. Since we haven't developed nor deployed that, return to JDeveloper to complete it. Recall that we have already created a page that has just the delivered DocumentViewer bean and we set a custom Controller. Here is how you should write your Controller code:

Here's the text in case you'd like to copy/paste. I removed some white-space so it would fit on the screen print above.
package hack.oracle.apps.per.hack.webui;
import oracle.apps.fnd.common.VersionInfo;
import oracle.apps.fnd.framework.webui.OAControllerImpl;
import oracle.apps.fnd.framework.webui.OAPageContext;
import oracle.apps.fnd.framework.webui.beans.OAWebBean;
import oracle.apps.fnd.framework.OAApplicationModule;
import oracle.jbo.domain.BlobDomain;
import oracle.apps.xdo.oa.common.DocumentHelper;
import java.io.*;
public class gvsDocCO extends OAControllerImpl
{
public static final String RCS_ID="$Header$";
public static final boolean RCS_ID_RECORDED =
VersionInfo.recordClassVersion(RCS_ID, "%packagename%");
/**
* Layout and page setup logic for a region.
* @param pageContext the current OA page context
* @param webBean the web bean corresponding to the region
*/
public void processRequest(OAPageContext pageContext, OAWebBean webBean)
{
super.processRequest(pageContext, webBean);
pageContext.writeDiagnostics(this,"GVS - Version 2.0",3);
String strPersonId = pageContext.getParameter("PersonId");
pageContext.writeDiagnostics(this,"GVS - strPersonId: " + strPersonId,3);
//
OAApplicationModule oaAM = pageContext.getApplicationModule(webBean);
//
pageContext.putParameter("p_DataSource",DocumentHelper.DATA_SOURCE_TYPE_BLOB);
pageContext.putParameter("p_DataSourceCode","GVS_EMP_VERIF");
pageContext.putParameter("p_DataSourceAppsShortName","PER");
pageContext.putParameter("p_TemplateCode","GVS_EMP_VERIF");
pageContext.putParameter("p_TemplateAppsShortName","PER");
pageContext.putParameter("p_Locale","Default");
pageContext.putParameter("p_Locale","English:United States");
pageContext.putParameter("p_OutputType","PDF");
pageContext.putParameter("p_XDORegionHeight","200%");
Serializable[] oaParams = {strPersonId};
BlobDomain result = (BlobDomain)oaAM.invokeMethod("getGVSData",oaParams);
pageContext.putSessionValueDirect("XML_DATA_BLOB", result);
}
public void processFormRequest(OAPageContext pageContext, OAWebBean webBean)
{
super.processFormRequest(pageContext, webBean);
}
}
Notice that I am doing all of the code in the processRequest. This event fires when the page loads as opposed to pushing a button to generate the document. I want to click a button, launch the page and have the document launch automatically. If you would like the document creation to occur only if you press a button on your custom page just move the last two lines into the processFormRequest.
Also notice that I set the default as "PDF" using this line:
pageContext.putParameter("p_OutputType","PDF");
If you include a default output type you will not get a drop-down from Oracle that allows you to choose a different document type. I will show how it looks both ways later. For now, continue your Jdeveloper hacking by creating an Application Module.
Right-click your project and choose New Application Module...

Here's what it looks like in JDeveloper:

And the text for copy/paste purposes:
package hack.oracle.apps.per.hack.server;
import oracle.apps.fnd.framework.server.OAApplicationModuleImpl;
import oracle.apps.fnd.framework.OAException;
import oracle.apps.fnd.framework.server.OADBTransactionImpl;
import oracle.apps.fnd.framework.server.OADBTransaction;
import oracle.jbo.domain.BlobDomain;
import oracle.apps.xdo.oa.util.DataTemplate;
import java.sql.SQLException;
import oracle.apps.xdo.XDOException;
import com.sun.java.util.collections.Hashtable;
public class gvsPubAMImpl extends OAApplicationModuleImpl {
/**This is the default constructor (do not remove)
*/
public gvsPubAMImpl() {
}
/**Sample main for debugging Business Components code using the tester.
*/
public static void main(String[] args) {
launchTester("hack.oracle.apps.per.hack.server", /* package name */
"gvsPubAMLocal" /* Configuration Name */);
}
public BlobDomain getGVSData (String strPersonId)
{
BlobDomain blobDomain = new BlobDomain();
try
{
DataTemplate datatemplate = new DataTemplate(((OADBTransactionImpl)getOADBTransaction()).getAppsContext(), "PER", "GVS_EMP_VERIF");
Hashtable parameters = new Hashtable();
parameters.put("P_PERSON_ID",strPersonId);
datatemplate.setParameters(parameters);
datatemplate.setOutput(blobDomain.getBinaryOutputStream());
datatemplate.processData();
}
catch(SQLException e)
{
throw new OAException("SQL Error=" + e.getMessage(),OAException.ERROR);
}
catch (XDOException e)
{
throw new OAException("XDOException" + e.getMessage(),OAException.ERROR);
}
catch(Exception e)
{
throw new OAException("Exception" + e.getMessage(),OAException.ERROR);
}
return blobDomain;
}
}
Notice the line "new DataTemplate" needs your Data Template code as the second parameter; the first parameter is the application short name, in my case I used "PER" for Human Resources. Also, any parameters can be supplied using a Hashtable. Remember that my Concurrent Program has one parameter defined and I called the token "P_PERSON_ID". This must match here when supplying a parameter to it. That's it as far as coding goes. In order to deploy this to Oracle Applications you must perform the following:
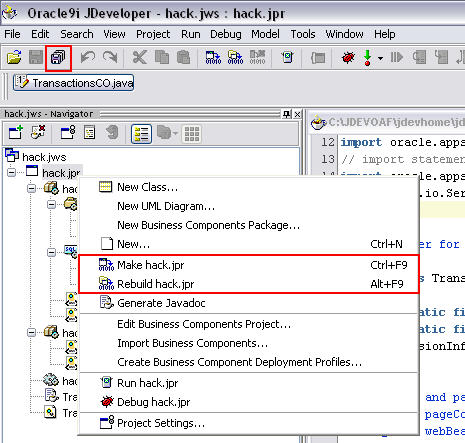
1. Make and Rebuild your project in JDeveloper
2. .zip the project on your computer and FTP it to $JAVA_TOP
3. Unzip the project in $JAVA_TOP
4. Import the custom page into the database
5. Bounce apache and OA Core
There are two different ways to import your custom page. One is to use jpximport on your machine. The other is to use the XML Importer on the middle tier. Both work fine; I used the jpximport locally using this command:
C:\JDEVOAFR12\jdevbin\oaext\bin\import C:\JDEVOAFR12\jdevhome\jdev\myclasses\hack\oracle\apps\per\hack\webui\gvsPubPG.xml -rootdir C:\JDEVOAFR12\jdevhome\jdev\myclasses -mmddir "C:\JDEVOAFR12\jdevbin\oaext\config\mmd" -username "apps" -password "password123" -dbconnection "(DESCRIPTION=(ADDRESS=(PROTOCOL=tcp)(HOST=test.hack.com)(PORT=1521))(CONNECT_DATA=(SID=HACK)))"
Once you have completed steps 1-5, log in and press the button you configured earlier:

If you press the Export button in the above picture you can download the file:

Recall that I defaulted the document to open automatically and specified PDF. If you comment out this line:
pageContext.putParameter("p_OutputType","PDF");
You will have the choice to choose HTML, PDF, Excel or RTF:

What's it look like in HTML?

Option to download RTF:

Excel:

Wednesday, September 29, 2010

HideShowHeader bean and the setDefaultDisclosed property

Today's exercise will focus on one and only one property available to you in JDeveloper. This property is called the "setDefaultDisclosed" property and it controls whether a HideShowHeader region is expanded or collapsed. When you setup a pageLayout and associated regions this is set declaratively. That is, you set a property which controls how it is displayed on the page and you never worry about it again. The users have free regin to toggle it all they want.

However, suppose Oracle provides a HideShowHeaderRN on a page that is closed by default and you would like this to be expanded by default. If you struggle to think of an example of this, I've taken the liberty of providing one from Self Service Human Resources. Complete any of the Manager Self Service functions and hit the Review page. The list of approvers will be listed at the bottom of the page (if you configured AME correctly) and you have the option of adding an Ad Hoc approver:


As you can see it defaults to the collapsed state. Suppose you would like to auto-expand this when the page loads. Here is the expanded state that you'd like to see by default:


In the interest of time, we're going to skip the fundamentals on how to extend a Controller .class (CO) file in Oracle Applications. End-to-end steps on how to perform a CO extension be found in the following articles:

Controller class extension in 11.5.10
Controller class extension in R12

For our purposes, it is enough to know that programmatically setting a property on a web bean inside Oracle Applications occurs inside a Controller .class. We'll still need to know which of the COs to extend, so start by clicking the "About this Page" link in the lower left corner of the page. If you don't have that, set the profile option FND: Diagnostics for your user, clear the cache and then rejoin us. Be sure to click "Expand All" when you get to the page:


Scroll down until you see the Approval region. We'll start with the ApprovalsCO file:


To see where this file is stored in Oracle, expand the Business Component References Details hide/show item:


The complete path is oracle.apps.ame.dynamicapprovals.webui.ApprovalsCO:


This will be important as we will be importing and then extending this delivered code inside JDeveloper.

We will do the following:
  1. Import the page with the approvals section into JDeveloper
  2. Set a new controller class for the Region that extends the delivered CO
  3. set the setDefaultDisclosed property of the HideShowHeader region
Download the page definition of from the database using jdr_utils.printDocument. You'll want to start with the Review page that all SSHR transactions use and repeat the procedure until you get to the approvals section:


set feedback off
set serveroutput on format wrapped
set linesize 100
spool hack.lst
--
execute jdr_utils.printDocument('/oracle/apps/per/selfservice/review/webui/ReviewPG',100);
--
spool off


After studying the output from the above command, notice the /oracle/apps/ame/dynamicapprovals/webui/ApproversRN:


Re-run the jdr_utils.printDocument command and save the output in C:\jdevoafr12\myprojects\oracle\apps\ame\dynamicapprovals\webui\ApproversRN.xml where jdevoafr12 is the home where you installed JDeveloper for R12.

Inside JDeveloper, File -> Import -> Java Source to import the page definition. Once it appears, click it, then drop down into the structure and highlight the area region where you'd like to assign a new Controller. Naturally, I will use the prefix "hack" for my package: hack.oracle.apps.ame.dynamicapprovals.webui and hackApprovalsCO for the file name:


Here is the extended Controller .class file with comments inline:


/*===========================================================================+
| Copyright (c) 2001, 2005 Oracle Corporation, Redwood Shores, CA, USA |
| All rights reserved. |
+===========================================================================+
| HISTORY |
+===========================================================================*/
package hack.oracle.apps.ame.dynamicapprovals.webui;

import oracle.apps.fnd.common.VersionInfo;
import oracle.apps.fnd.framework.webui.OAControllerImpl;
import oracle.apps.fnd.framework.webui.OAPageContext;
import oracle.apps.fnd.framework.webui.beans.OAWebBean;
// import the delivered Controller
import oracle.apps.ame.dynamicapprovals.webui.ApprovalsCO;
// import the HideShowHeader bean...
import oracle.apps.fnd.framework.webui.beans.layout.OAHideShowHeaderBean;

/**
* Controller for ...
*/
// make sure you extend the delivered CO...
public class hackApprovalsCO extends ApprovalsCO
{
public static final String RCS_ID="$Header$";
public static final boolean RCS_ID_RECORDED =
VersionInfo.recordClassVersion(RCS_ID, "%packagename%");

/**
* Layout and page setup logic for a region.
* @param pageContext the current OA page context
* @param webBean the web bean corresponding to the region
*/

public void processRequest(OAPageContext pageContext, OAWebBean webBean)
{
// this line tells Oracle to run the default code, place your updates after it...
super.processRequest(pageContext, webBean);
pageContext.writeDiagnostics(this,"hackApprovalsCO - 10",3);
//
// instench-e-ate the HideShowHeader bean...
//
OAHideShowHeaderBean oaHideShowHeader = (OAHideShowHeaderBean)webBean.findIndexedChildRecursive("AdhocApproversShowHideRN");
//
// expand it...
//
oaHideShowHeader.setDefaultDisclosed(pageContext, Boolean.TRUE);
//
pageContext.writeDiagnostics(this,"hackApprovalsCO - 90",3);
}

/**
* Procedure to handle form submissions for form elements in
* a region.
* @param pageContext the current OA page context
* @param webBean the web bean corresponding to the region
*/
public void processFormRequest(OAPageContext pageContext, OAWebBean webBean)
{
super.processFormRequest(pageContext, webBean);
}
}


  1. Make
  2. Compile
  3. Save
  4. .zip
  5. FTP
  6. unzip
  7. personalize
  8. Apouncy batch

After you've compiled and saved your works, .zip up the directory and FTP it to $JAVA_TOP. Unzip it and then get into the application to point at your new Java file. Login to Manager Self Service and start a "Change Hours" transaction, hitting the review page and then clicking Personalize Page in the upper right-hand corner:


Click the Complete View radio button so you can find the item you need to edit:


Scroll down until you find this one:


Set the value of the Controller .class field to the following string. I happen to do this at the Responsibility level so that my hacking doesn't disrupt the work of others in the system:

hack.oracle.apps.ame.dynamicapprovals.webui.hackApprovalsCO


Click Apply and you'll be back on the Review page. In my case I had to pounce abatchy (bounce Apache) in order for this to take effect so wait 20 seconds if you have access to do this. You'll have to wait at least 4 hours if you need an overseas DBA to do it for you:

$ADMIN_SCRIPTS_HOME/adapcctl.sh stop
$ADMIN_SCRIPTS_HOME/adapcctl.sh start
$ADMIN_SCRIPTS_HOME/adoacorectl.sh stop
sleep 10
$ADMIN_SCRIPTS_HOME/adoacorectl.sh start

For added emphasis, enable Diagnostics before reviewing your handiwork by performing the following:


Now start a new transaction, striking the review page with great fervor. The HideShowHeader bean is expanded when the processRequest method is fired (when the page loads):


Scroll down deep into the diagnostics and find the debug messages you wrote to output:


And that is how to auto-expand a HideShowHeader bean in Oracle Applications using JDeveloper.

Thursday, June 17, 2010

Create a custom OA Framework page inside Oracle Applications

Today's topic will cover how to create a custom Page and Region using JDevloper and then deploy it to Oracle Applications. This exercise will allow you to create a page any way you would like and have it available inside Oracle Applications. As a practical requirement, lettuce design a page that Oracle doesn't provide out-of-the-box and add it to our Self Service Human Resources (SSHR) application.

It comes up frequently that clients would like to view information about SSHR transactions that are In-Progress (and Completed, but we're going to start small). While some information can be found using the Workflow responsibilities, more comprehensive forms canbe built using OA Framework so HR can monitor the pending transactions.

As with other how-tos on this site, refer to Note: 416708.1 or 787209.1 (newer) on Metalink titled "How to find the correct version of JDeveloper to use with eBusiness Suite 11i or Release 12" to find the right version. You might find after working with this product that none of them are right for you. I often feel this way.

To keep my hacking from disturbing other areas of the application, I have created my own responsibility, menu and functions for this exercise. Here is the current list of funtions; we will add a new function which will be our custom page at the bottom of this list:


Once you have the product downloaded and unzipped, open it up. Right-click on the Workspaces node and select "New OA Workspace..."


Enter an arbitrary name for your Workspace. In keeping with convention, mine will be called "hack.jws". Leave the default directory alone. This is where JDev will put the uncompiled java files you will be creating via this tool.


Enter a new file name for the project file. Use the same name as your workspace here. Enter a default package by beginning with an arbitrary identifier (in my case, 'hack') followed by oracle.apps and then any additional levels you'd like to add that make sense. Since this is related to SSHR, I will use 'per'. The 'webui' on the end specifies the package where user-interface objects like the page and controller .class (code that controls events and button-clicks, etc.) will be created.


Click Next...


When you get to the Runtime Connection, it's time for a detour. You will need to specify a .dbc (Database Connection) file. This is stored on the middle tier at $FND_TOP/secure (for 11.5.10). It must be copied to C:\JDEVOAF\jdevbin\jdev\multi\system\oa\dbc_files\secure on your local machine, where "JDEVOAF" is the directory where you installed JDeveloper.


Another option is to generate the file locally by following these steps. Go to the application URL home page and append this to the URL:

/OA_HTML/jsp/fnd/aoljtest.jsp

Enter the appropriate details:


Scroll to the bottom and click the link:


Choose the "Locate DBC File" link:


Copy this file and save it as hack.dbc to C:\JDEVOAF\jdevbin\jdev\multi\system\oa\dbc_files\secure on your local machine where C:\JDEVOAF is the directory where you installed JDeveloper.

You can now proceed with Step 3 by selecting the .dbc file and entering an Oracle Apps username/password combination here, leaving the responsibility/code the same:


Big finish:


Now that your Workspace/Project is created, right-click and choose "New Business Components Package..."


Skip the Welcome screen and leave the defaults shown here:


On the next screen, we will need to specify a connection. Since none yet exists, click New...


Skip the welcome page again and specify an arbitrary name for the Connection Name and leave the Connection Type as "Oracle (JDBC)":


Enter the username/password, click Next...


Enter the connection details for your instance:


Success!


Continue on through the wizard, clicking next on Step 3 of 3 and then Finish:


Now that you have a new OA workspace, project and default package, you can begin creating your custom page:


Right-click the project and choose New:


When the page appears, select Web Tier -> OA Components -> Page:


The title is arbitrary, but we'll name is something meaingful like TransactionsPG:


Once the page is created, start by renaming the first region to 'pageLayoutRN'. This is just a good practice to have all regions ending in "RN". Pages are "PG", View Objects "VO", etc:


Once you are done, right-click the pageLayout region and choose "Set New Controller". This will create a template file that will handle events/mouse-clicks on the page:


JDev will ask you where you'd like to put this code. Choose the "webui" package and be sure that the keyword "webui" is not repeated at the end. I will keep the naming convention the same as the page and call it TransactionsCO. It should look like this:


We want to display information about our transactions that are in-progress. We'll further stipulate that we only want to see those transactions created by the manager using this function. Let's start with some SQL. Here is a SQL statement to find some basic information about the transactions created by a particular person id. If you'd like to get fancy and add additional joins to bring in the approvals, etc, go for it:


And here's the SQL in case you'd like to copy/paste:


select hat.transaction_id
,hat.transaction_effective_date
,fffv.user_function_name
,papf_sup.full_name creator_person
,papf_emp.full_name selected_person
,hat.item_type
,hat.item_key
,hat.process_name
,hr_general.decode_lookup('PQH_SS_TRANSACTION_STATUS',hat.status) status
,hat.last_update_date
from hr_api_transactions hat
,per_all_people_f papf_sup
,per_all_people_f papf_emp
,fnd_form_functions_vl fffv
where 1 = 1
and hat.creator_person_id = papf_sup.person_id
and hat.transaction_effective_date between papf_sup.effective_start_date and papf_sup.effective_end_date
and hat.selected_person_id = papf_emp.person_id
and hat.transaction_effective_date between papf_emp.effective_start_date and papf_emp.effective_end_date
and hat.function_id = fffv.function_id
and hat.creator_person_id = :1
order by hat.transaction_id desc
Let's create a region on the page to display this data. Right-click the pageLayoutRN -> New -> Region


Immediately you'll see your new region under the pageLayoutRN. Set the properties as shown below. These properties just set the region type = table and give it a nice heading of "In-Progress Transactions" that will be displayed on the page:


We now have a region that can display our data, but we must create a View Object inside our project to retrieve this data. Right-click the project and choose New Business Components Package:


JDev will prompt you to name the package. Since we're working with data, this package should be named with "server" on the end. Mine will be called: hack.oracle.apps.per.server. Click "Next" after entering:


Leave the defaults and click Next on step 2:


Click Finish:


Now that you have a new package to store your data objects, right-click it and choose New View Object:


Lettuce call the new View Object TransactionsVO and place it in the package shown by default:


Next:


Next:


Next:


Copy/paste the SQL statement along with the bind variable :1 into window of Step 5 and test it for correctness before clicking Next:


Leave the defaults and click Next:


Click Next for the last time on this Wizard and then Finish:


So far, you have a Page with a table region and a View Object to retrieve the data. The table region can display the VO but for this to happen, we must perform the following:

  1. Create an Application Module
  2. Associate the View Object with the Application Module
  3. Congifure the page to point at the proper Application Module and View Object
  4. Write rudimentary code to bind the variable to our View Object at run time

First, right click the "server" Business Components Package and choose "New Application Module":


Click Next at the introduction screen. I skipped that screen since we're at 44 screen prints and counting. Use a catchy name like "TransactionsAM" for the title and leave the default for the package value:


On Step 2, highlight the VO on the right and click the shuttle button in the center, thereby tying the VO to the Application Module. Click Next when finished:


Click Next on Step 3 of 4:


Click Finish on Step 4 of 4 to create the AM .java file:


Find your page in the Navigator pane in JDev and then choose the pageLayoutRN. This is where you will want to set the Application Module. Click the elipsis and choose the only available AM:


Once this step is complete, right-click on the table that is nested beneath the pageLayout region and create a new Item:


Here you will give the item a unique name (I use "txt" in front of all display objects), an Item Style of "messageStyledText" and choose the View Object and View Attribute:


A close-up of the View Attribute property:


Here is a summary of all properties. I added the Prompt and Sort Allowed properties:


You must repeat for each field from the View Object you wish to see on the page/pagina. I added 7 additional fields:


We now must bind the variable in the View Object so that we pick up only specific records instead of all In-Progress transactions. To do this, the following must happen:

  1. Create a method in the VO to bind the variable
  2. Create a method in the Application Module to pass the parameter to the VO
  3. Create a method-call in the Controller .class to initiate the whole sequence

Let's start by double-clicking the View Object Implementation file (VOImpl) and adding some code:


The import command allows you to write messages in the output of the VOImpl as it executes. The method call is pretty straightforward. Set the WHERE clause to null, bind the parameter and execute the query. The JDev table bean will handle presenting the data according to how you chose to decorate your table by using messageStyledText or messageTextInput fields, etc.


package hack.oracle.apps.per.server;
import oracle.apps.fnd.framework.server.OAViewObjectImpl;
import oracle.apps.fnd.common.AppsLog;
// ---------------------------------------------------------------
// --- File generated by Oracle Business Components for Java.
// ---------------------------------------------------------------

public class TransactionsVOImpl extends OAViewObjectImpl
{
/**
*
* This is the default constructor (do not remove)
*/
public void bindVals(String strPersonId)
{
AppsLog myAppsLog = new AppsLog();
if(myAppsLog.isEnabled(3))
{
myAppsLog.write("fnd.common.WebAppsContext", "HACK - hack.oracle.apps.per.server", 3);
}
setWhereClauseParams(null);
setWhereClauseParam(0, strPersonId);
executeQuery();
}
public TransactionsVOImpl()
{
}
}


Double-click the TransactionsAMImpl.java file next and add a call to pass the variable to the VO:


The import statement at the top was added again for output messages. Additionally, add the initQuery method. Inside, you can see it just sends the strPersonId variable to the VO's bindVals method:


package hack.oracle.apps.per.server;
import oracle.apps.fnd.framework.server.OAApplicationModuleImpl;
import oracle.apps.fnd.common.AppsLog;
// ---------------------------------------------------------------
// --- File generated by Oracle Business Components for Java.
// ---------------------------------------------------------------

public class TransactionsAMImpl extends OAApplicationModuleImpl
{
/**
*
* This is the default constructor (do not remove)
*/
public TransactionsAMImpl()
{
}
/**
*
* Container's getter for TransactionsVO1
*/
public TransactionsVOImpl getTransactionsVO1()
{
return (TransactionsVOImpl)findViewObject("TransactionsVO1");
}

public void initQuery (String strPersonId)
{
AppsLog myAppsLog = new AppsLog();
if(myAppsLog.isEnabled(3))
{
myAppsLog.write("fnd.common.WebAppsContext", "HACK - initQuery 1", 3);
}
getTransactionsVO1().bindVals(strPersonId);
//
if(myAppsLog.isEnabled(3))
{
myAppsLog.write("fnd.common.WebAppsContext", "HACK - initQuery 2", 3);
}
}
/**
*
* Sample main for debugging Business Components code using the tester.
*/
public static void main(String[] args)
{
launchTester("hack.oracle.apps.per.server", "TransactionsAMLocal");
}
}


It's time to initiate the whole sequence when the page actually loads by making a method call in the Controller .class file. Double click the TransactionsCO.java file and begin editing as shown below. At this point, we are only editing the processRequest method which is called when the page loads. When you are confident with this exercise you can edit the processFormRequest and add event handling for button clicks and so forth.


The pageContext.getEmployeeId() is a built-in that will provide the person_id of the current user, in this case the manager/creator of the transaction. It is then cast as a string. The Application Module for this part of the page is found and then an array is created and populated with the person_id. Finally, the invokeMethod call kicks off the process of binding the variable and running the query.

Once you have reached this point, do a "Make" and then a "Rebuild" and then Save your works.


Now that development is complete, how do we deploy this to Oracle Applications? Let's first create a custom function in the app:

(N) Functional Administrator -> Core Services -> Functions -> Create Function

Configure and click Continue:


Configure and click Submit:


The function is ready, but it's not attached to the Hack Manager Self Service menu, nor is it available for use. We must add it to the following menus:

  1. HACK Manager Self Service (or your custom Manager Self Service menu)
  2. Global Self Service Functions Custom
  3. Manager Actions Menu
Add it to each of the menus as shown here:


Clear the cache so that the function appears on the menu:


Currently we have a function that points at custom code but we have not yet deployed it to the application and database. The following must occur to complete this exercise:

  1. Deploy JDev code to the application tier under $JAVA_TOP
  2. Import the custom page into the database
  3. Bounce apache

Start by browsing to C:\JDEVOAF\jdevhome\jdev\myclasses where "C:\JDEVOAF\" is the directory where you installed JDeveloper. Find the folder called "hack" and .zip it. This will contain all the compiled .class files and .xml files from when you performed a "Make" and "Rebuild".

Do the following:

  1. FTP the .zip file to the middle tier
  2. Move it to $JAVA_TOP
  3. Unzip the file

Next, execute the following from a command prompt. This will import the custom page into the Java Document Repository (set of tables prefixed with "JDR"):

C:\JDEVOAF\jdevbin\jdev\bin\import C:\JDEVOAF\jdevhome\jdev\myprojects\hack\oracle\apps\per\webui\TransactionsPG.xml -rootdir C:\JDEVOAF\jdevhome\jdev\myprojects\ -userId 1 -username apps -password hack -dbconnection "(DESCRIPTION=(ADDRESS_LIST=(ADDRESS=(PROTOCOL=tcp)(HOST=oracle.hack.local)(PORT=1521)))(CONNECT_DATA=(SERVICE_NAME=hack)))"

The page is now imported:


Once all the files are in place, bounce apache and test your new creation:


Now that you know the basics, the sky's the limit. Add a details image to drill-down to the transaction specifics. Add a pop-up to display the approvals chain, etc.